Roomba is one of the world’s most popular robotic vacuum cleaners that can be used to automatically clean your house.
Thanks to smart technology, all that the user has to do are deploy his Roomba and let it do its job.
The only complicated thing about owning a Roomba is the initial installation.
Setting up the unit and mapping out everything before dividing it into different sections can take a bit of a toll on your mood. However, there are no quick methods that can help you bypass that.
You will have to spend time adjusting the Roomba accordingly and then move forward with the setup routine to get your system ready.
From here, you can test out a few cleaning cycles to see whether or not the unit will respond well to your commands.
How to Fix Roomba Not Running on Schedule?
Plenty of users have been complaining that they are unable to get their Roomba to run on schedule.
The users also specified how the device was working just fine when using it manually. However, the problem seems to arise when Roomba is not running on schedule.
In this article, we will be taking an extensive look at how you can troubleshoot the issue.
We will be mentioning a number of ways that should all help in resolving the problem. Here are all of them listed down below:
- Try Deleting and Adding the Schedules Again
One thing you can do which should be able to fix your issue is to try and remove all the schedules that you have installed on your computer.
In order to do this, you will have to hold down the DAY button on your Roomba for around 5 seconds.
Once you are done, you should see all of your schedules getting deleted. Afterward, you will have to add all of your schedules again.
What this will basically do is refresh all of your schedules again. It could be that one of your schedules is interfering with another one.
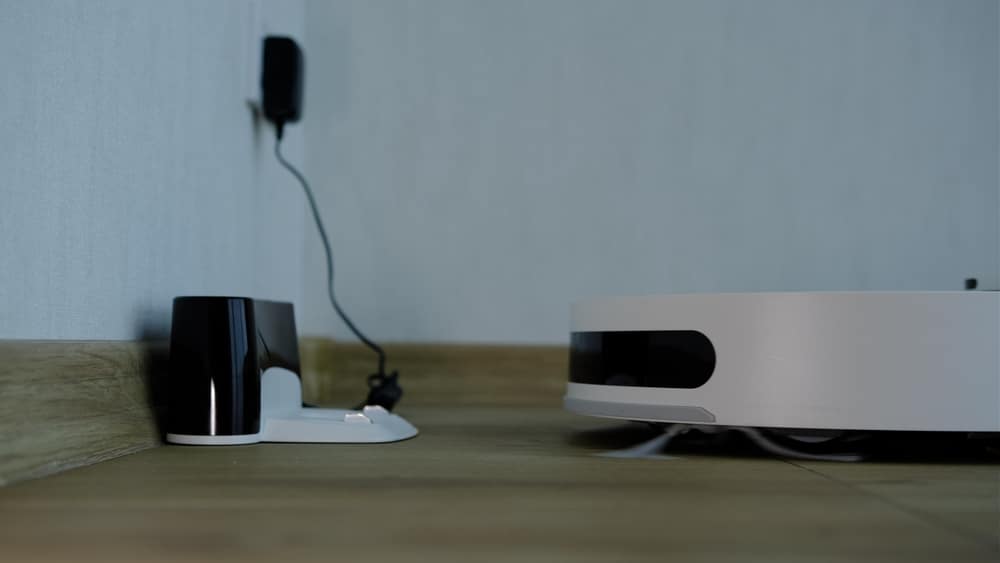
- Check The Charging Status
At this point, you need to take a peek at the charging status and make sure that the robot is charged properly before the cleaning cycle is engaged.
You can’t expect the unit to be on schedule when there are issues with the charging status, and there is quite a bit of things that you need to consider.
The first thing that you need to check is the placement of the dock and make sure that the unit is able to engage properly with the charging base.
From there, you need to check up on the power supply from the main source and make sure that the voltage is optimal.
Once that is done, you can proceed with checking up on the condition of the battery. If the battery has not been replaced in a few years, now might be a good time for a new one.
There is no point in sticking with a drained battery if it keeps dying out before the cleaning cycle is finished.
So, be sure to keep track of all of these pointers and then go about fixing the issue accordingly when you can’t seem to get a response from the smart unit.
It all comes down to securing the power supply to the unit and making sure that the device has enough juice to engage the cleaning cycle without any input.
- There Might Be Obstructions
Next, you need to also check for obstructions. While the robot is pretty powerful, obstructions close to the docking station can lead to issues with the schedules not engaging properly.

Even if you have defined the routine properly, you need to make sure that the pathway is clear.
The only thing that you need to keep in mind here is that there should be nothing directly sitting beside the dock, and the robot should be able to get off with ease.
Even small decoration pieces can create issues here, and you will not be able to get anything out of the system.
It all comes down to how you’re planning on dealing with the situation.
Fixing the unit will come easy to you as long as you follow these pointers and make sure that the fully charged Roomba can make its way from the docking station to the target region.
Most of the time, all issues will be addressed right here, and you will not have to deal with more complications.
Unless, of course, there are hardware issues with the motor not engaging the wheels or the brushes. So, be sure to check up on that next.
- Check The Base & Dock Engagement
Next, you need to check the base for damage and make sure that the wheels are able to move freely.
Sometimes, the dock is elevated on a slanted floor, and the wheels are not able to engage properly.
This is especially true if you have a habit of physically picking up the Roomba unit and then docking it manually.
So, if you’re in the same boat here, you need to check the engagement of the wheels and make sure that the Roomba can make its way off the dock.
From there, you can also check the base for clogged hair and debris. Similarly, there is no harm in emptying out the dustbin at this point either.
All that you’re trying to do here is make sure that the motor can move the wheels and the Roomba can get started with the suction features.
From there, you will be able to secure a consistent response from the device without worrying about any complex setup routines.
However, if you find there to be hardware issues and the base is cracked, or the motor won’t work with the wheels, then you need to check in with the dealer.
You can try your luck with inspecting the battery one more time, but the safer thing to do here is to call the dealer for help.
- Try Manually Engaging The Cleaning Cycle
Manually engaging the cleaning cycle is another great thing that you can do to check up on the issue.
This will help you figure out the main cause behind the error. If the unit gets engaged properly with the manual cleaning cycles, then you will be able to narrow down the issue to the programming issues.
From there, you can go through the basic reset routine one more time to fix the issue. Hopefully, the situation will be addressed right here, and you will not have to deal with more complications down the road.
On the other hand, if you’re still not getting any response from the unit, then you got unlucky with the purchase.
The unit might have sustained damage during the delivery, and you will need to get help from the dealer to get a new one. There are no workarounds for a damaged device.
Luckily, the warranty maintained by Roomba units will be more than enough to help you through this situation.
So, be sure to claim the warranty accordingly when you can’t seem to get a decent response from the Roomba schedules.
- Try Rebooting
A number of users have been reporting that restarting Roomba somehow managed to resolve their issue. On asking such users, all they did was that they reboot the device.

This is why we recommend that you try doing the same thing and reboot Roomba. Hopefully, your issue should be gone afterward.
- Reset the Device
A potential fix to the issue would be to reset your device. Resetting helps in restoring the device’s settings to default.
It could be that there is some sort of bug in your settings that could be causing your device to not work as scheduled.
However, you can fix the issue by resetting the device. In order to successfully reset the device, you will have to hold the two buttons that are beside the “Go” button for around 10 seconds.
After 10 seconds, you will have to reset your device, which should resolve your problem.
The Bottom Line
These are the ways how you can fix Roomba not running on schedule. Following the instructions that we have mentioned in the article should lead to a quick and easy fix.
Hence, ensure that you read through the article to avoid any further complications.
As long as you’re sure that there are no hardware issues and the device status is optimal, you will be able to secure a decent response from the unit.
Fixing the device will come easily to you, and you will not run into more errors down the road.
However, if you find there to be cracks on the unit as well as damaged connection points and rust, then your hands are pretty much tied.
There are no quick fixes or easier methods that can help you sort out these issues.
Instead, you will have to take the time out of your routine to reach out to the dealer and demand a replacement.
The upside here is that the warranty deal on these robots is one of the best on the market, and you’ll be able to surely secure a fresh piece in no time.