Signal Attenuation Through Walls Calculator
Estimate indoor WiFi RSSI, free-space path loss, wall attenuation, fade margin, and usable Mbps for 2.4 GHz, 5 GHz, and 6 GHz smart home links.
📶Smart Home RF Presets
📊Signal Path Inputs
Wall attenuation estimate
Calculation breakdown
🧱Wall Material Loss Grid
📘RF Reference Tables
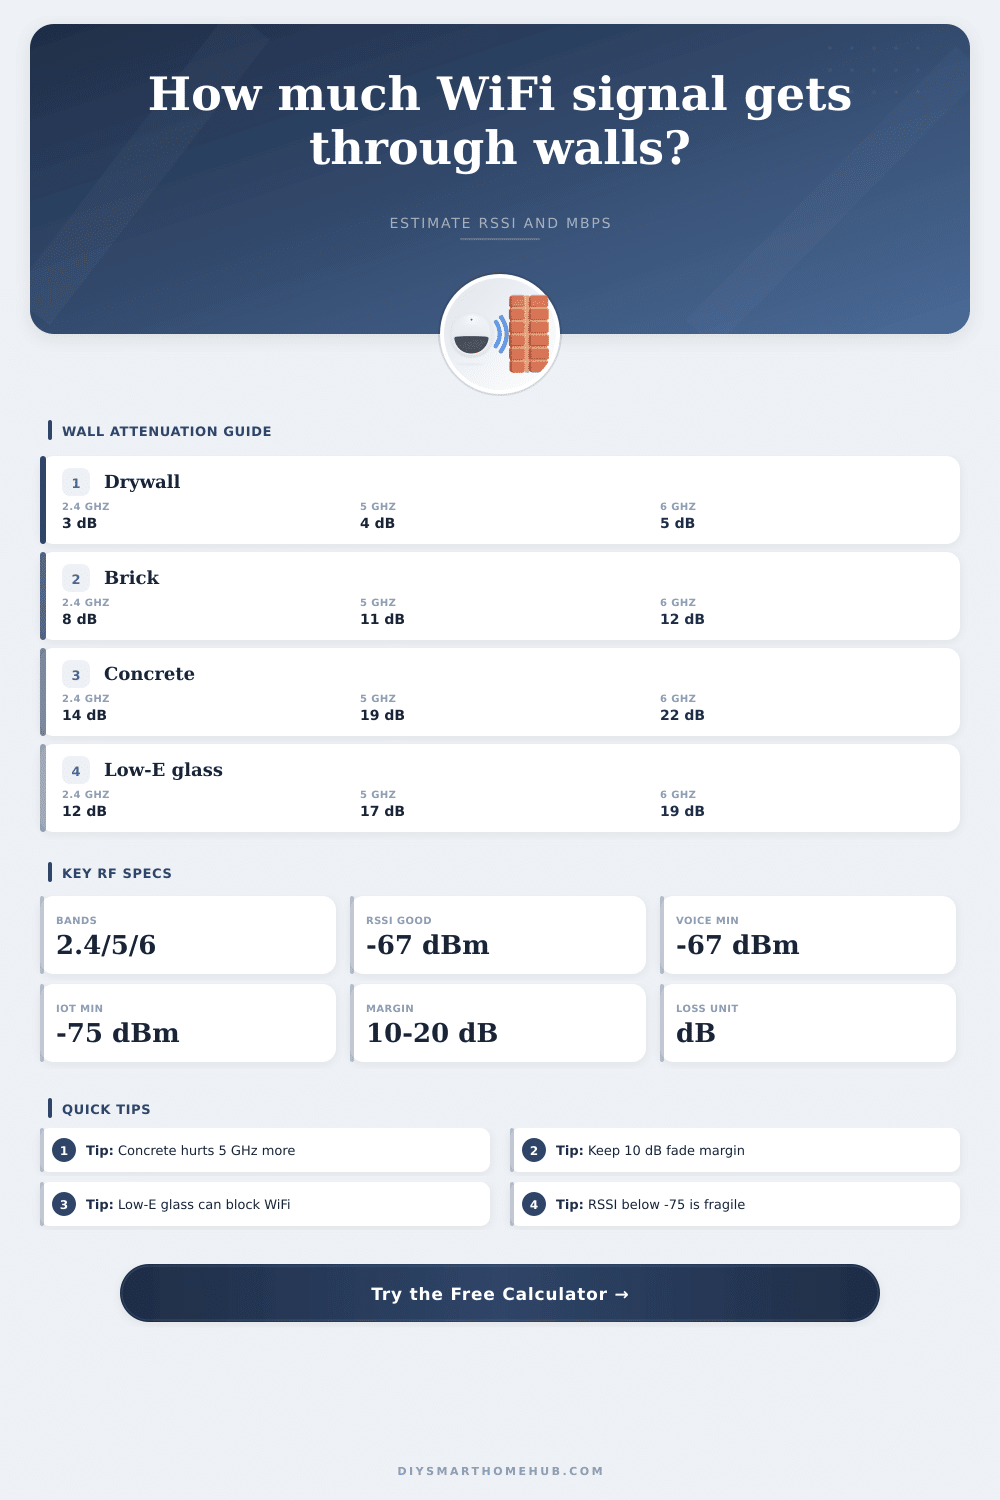
| Wall material | 2.4 GHz loss | 5 GHz loss | 6 GHz loss |
|---|
| Band | Center used | Signal behavior | Smart home fit |
|---|---|---|---|
| 2.4 GHz | 2437 MHz | Lowest path loss and best wall penetration, but more interference. | Sensors, IoT hubs, long-range cameras, low-rate links. |
| 5 GHz | 5180 MHz | About 6.5 dB more free-space loss than 2.4 GHz at the same distance. | Streaming, phones, laptops, and nearby access points. |
| 6 GHz | 5955 MHz | About 7.8 dB more free-space loss than 2.4 GHz and higher wall loss. | Same-room WiFi 6E, WiFi 7, and clean mesh backhaul. |
| RSSI range | Link quality | Typical usable Mbps | Planning note |
|---|---|---|---|
| -50 dBm or better | Excellent | 250-900+ Mbps | Strong enough for wide channels and high-rate devices. |
| -51 to -60 dBm | Very good | 150-600 Mbps | Usually reliable for streaming and responsive smart home control. |
| -61 to -67 dBm | Good | 60-300 Mbps | Common target for voice, video calls, and general WiFi coverage. |
| -68 to -75 dBm | Usable | 10-90 Mbps | Often acceptable for sensors and light browsing, less robust for video. |
| -76 to -82 dBm | Weak | 1-20 Mbps | May connect at low rates; battery devices can become inconsistent. |
| Below -82 dBm | Marginal | 0-5 Mbps | Expect retries, drops, and poor roaming unless the link is very low-rate. |
| Scenario | Distance | Obstacles | Best band choice |
|---|---|---|---|
| Smart lock at entry | 25-45 ft | Drywall plus door | 2.4 GHz for margin and battery stability. |
| Office laptop | 20-50 ft | One or two drywall walls | 5 GHz if RSSI stays better than about -67 dBm. |
| Garage camera | 40-80 ft | Exterior wall or masonry | 2.4 GHz or a nearer access point for stable upload. |
| 6 GHz mesh node | 10-35 ft | Open area or one light wall | 6 GHz only when the path is short and clean. |
| Basement hub | 30-70 ft | Floor, ducts, and concrete | 2.4 GHz or wired backhaul where possible. |
💡Calculation Tips
Maybe you’ve installed a camera in your garage to monitor for package thieves. When you go to check the footage from your livig room, the video’s frozen. There’s something wrong with the signal that went through all those walls. Now you see distinction between raw speed and real world performance. And the math is simple enough. The calculator does it for you. It converts theoretical radio frequency to practical “is this going to work” prediction. In other words: the tool removes guesswork from where you place things.
How much stuff is between them? What’s interfering? How far away are they? The key idea is something called path loss, which mean exactly what it sounds like: the reduction in signal strength as it passes through matter and space. As a radio wave travels, it expand outward. That expansion make the signal weaker. And the stronger the object is, the more it will block the radio’s passing.
How to Place Your WiFi Router
Faster signals (higher frequencies like 5 GHz) has higher data rates. But they go through walls very poorly compared than lower ones (like 2.4 GHz). So that’s the negotiation you’re making at home. A high frequency signal can lose close to twenty decibels of signal strength if passed through a thick concrete wall. In contrast, a low frequency signal is hardly impeded at all. That’s why you still get service on 2.4 GHz even when everything else in your home drop off.
How wall material affects your network plan are huge. Generally, drywall is fairly forgiving of wireless signals. Each panel will weaken signal by a couple of dBs. Concrete and brick is much more unforgiving. Windows with low-E coating also contain metal which blocks radio waves. This is what most homeowners fail to realize when they mount an access point close to their patio door. To see where material impacts your signal across different bands, check the table below.
While you don’t have to memorize the numbers, you can see that metal and concrete negatively affect high-speed WiFi signal. Knowing this will help you wisely place your gear. The other big variable is distance. In real structures, it’s never a straight shot. Measure it as the shortest possible distance directly across. Radio waves goes the most efficient way that exists. To adjust for that, you can enter the straight-line distance into the tool. Then it subtracts additional penalty based off how many floors and walls you pass through.
That is where flooring gets complicated, the joists and ductwork inside floors make them a bit of a minefield. Likewise, foil-backed insulation causes lots of loss. Sometimes a signal has to travel sideways to get to a bedroom on the second floor; that may weakens more than if it went to the second floor. Finally, you need some fade margin added to your calculation. This is to account for day-to-day variation due to interference sources like appliances in your house or your neighbor’s network.
What’s the lowest level that your phone could possibly pick up? That’s receiver sensitivity. Moddern phones can link up at pretty low signal strength. But just because it links doesn’t mean it’ll work well. At -80db, it might be able to maintain a connection just long enough to get out a text. It won’t do too hot with a video call, there are too many errors. Based off the expected RSSI, the calculator figures out how fast you might expect to go. It paints a reasonable picture of performance. It connects the dots from hard engineering data to an average person’s experience.
Another wrinkle involves smart home products. Most use low-power sensors, which require even bigger safety margin. When your WiFi signal drops just below one sensor’s threshold, that smart lock will stop working momentarily. It’ll either fail to respond to commands, or it’ll ring out when you expect it to be locked. Avoiding random failures requires planning for a wider margin. But they’re annoyingly hard to troubleshoot after the fact. For essential automations, it’s worth sacrificing a bit of possible speed for robustness.
There’s not much point having a high theoretical WiFi max throughput. That doesn’t matter as much as consistency across physical obstructions. Before you start drilling, you can estimate the signal loss and save yourself some big-time mistakes. You should of known this earlier. Your network reaches those places that really matter. Those are the same principles that help you avoid having your camera in the garage go offline. That makes it more of a strategy rather than guesswork. And that results in a strong network that delivers when it matters most.