Standing Desk Height Calculator
Dial in standing desk height from user height, elbow angle, footwear, anti-fatigue mat, keyboard thickness, monitor distance, sit/stand ratio, and wrist posture.
⚙Quick Presets
↔Units
📏Desk Setup Inputs
This calculator gives ergonomic starting points. Fine tune by comfort: shoulders relaxed, elbows near your sides, wrists flat, and neck level.
Standing Surface Height
-- --Monitor Eye-Line
-- --Elbow Range
-- --Transition Delta
-- --🛠Standing Desk Spec Grid
📋Elbow Angle Table
| Target | Desk effect | Best use | Check |
|---|---|---|---|
| 88-90 deg | Highest surface | Precise typing or drafting | Shoulders must stay relaxed |
| 95 deg | Slightly lower than elbow | Balanced typing and mouse use | Forearms feel light |
| 100 deg | Lower by about 1-2 in | Long work blocks | Wrists do not bend upward |
| 105 deg | Lowest standard target | Low-profile keyboards | Do not reach forward |
⌨Keyboard And Wrist Table
| Setup item | Typical value | Formula effect | Practical note |
|---|---|---|---|
| Low-profile keyboard | 0.4-0.7 in | Subtracts less from surface height | Often works directly on desk |
| Mechanical keyboard | 1.0-1.5 in | Subtracts more from surface height | Tray or wrist rest may help |
| Neutral wrist | 0 in | Hands align near forearm line | Good default target |
| Slight downward slope | -0.4 in | Lowers surface a little | Reduces wrist extension |
👁Monitor Distance Table
| Distance | Eye-line drop used | Screen target | Adjustment clue |
|---|---|---|---|
| 20-24 in | Low drop | Top near eye height | Reduce brightness and avoid leaning in |
| 25-30 in | Moderate drop | Top 0-2 in below eye height | Good range for most desks |
| 31-36 in | Higher drop | Center may sit lower | Increase text size before craning neck |
| 37-48 in | Capped drop | Use larger text or larger screen | Check readability first |
🕑Sit/Stand Ratio Table
| Standing share | Starter block | Daily rhythm | Setup priority |
|---|---|---|---|
| 25% | 10-20 min | Several short standing sessions | Fast transition controls |
| 40% | 20-35 min | Alternate through the day | Balanced seated and standing heights |
| 50-60% | 30-45 min | Stand for focus blocks | Mat, shoes, and monitor arm matter |
| 75% | 20-30 min with breaks | Frequent micro-movement | Avoid locking knees or overreaching |
✓Setup Tips
- Start at the calculated surface height, then move in half-inch steps until your shoulders stay low and your wrists stay flat.
- Measure shoes and mat together because both lift your elbows while the desk frame still measures from the floor.
- Raise the monitor separately instead of raising the whole desk to fix screen height; the keyboard height should lead the desk setting.
- Save two desk presets after testing: one seated surface and one standing surface, then use the transition delta as your memory target.
You splurged for the standing desk because you wanted more energy and better posture. A few days later, however, your shoulders is sore and your lower back throbs. Don’t blame the desk. Chances are it’s not the desk at all. In most cases, it’s the height of the desk. Everyone sets it to their elbow level regardless of whether they’re wearing shoes or have stuff on top of the desk. Guess what? That makes an ergonomic solution a tiring disaster.
Use the calculator above. Plug in your variable and let the math do its thing. This spares you the guesswork about how much a couple of inches (or a heavy pair of boots) change the result.
How to Set Your Desk Height Correctly
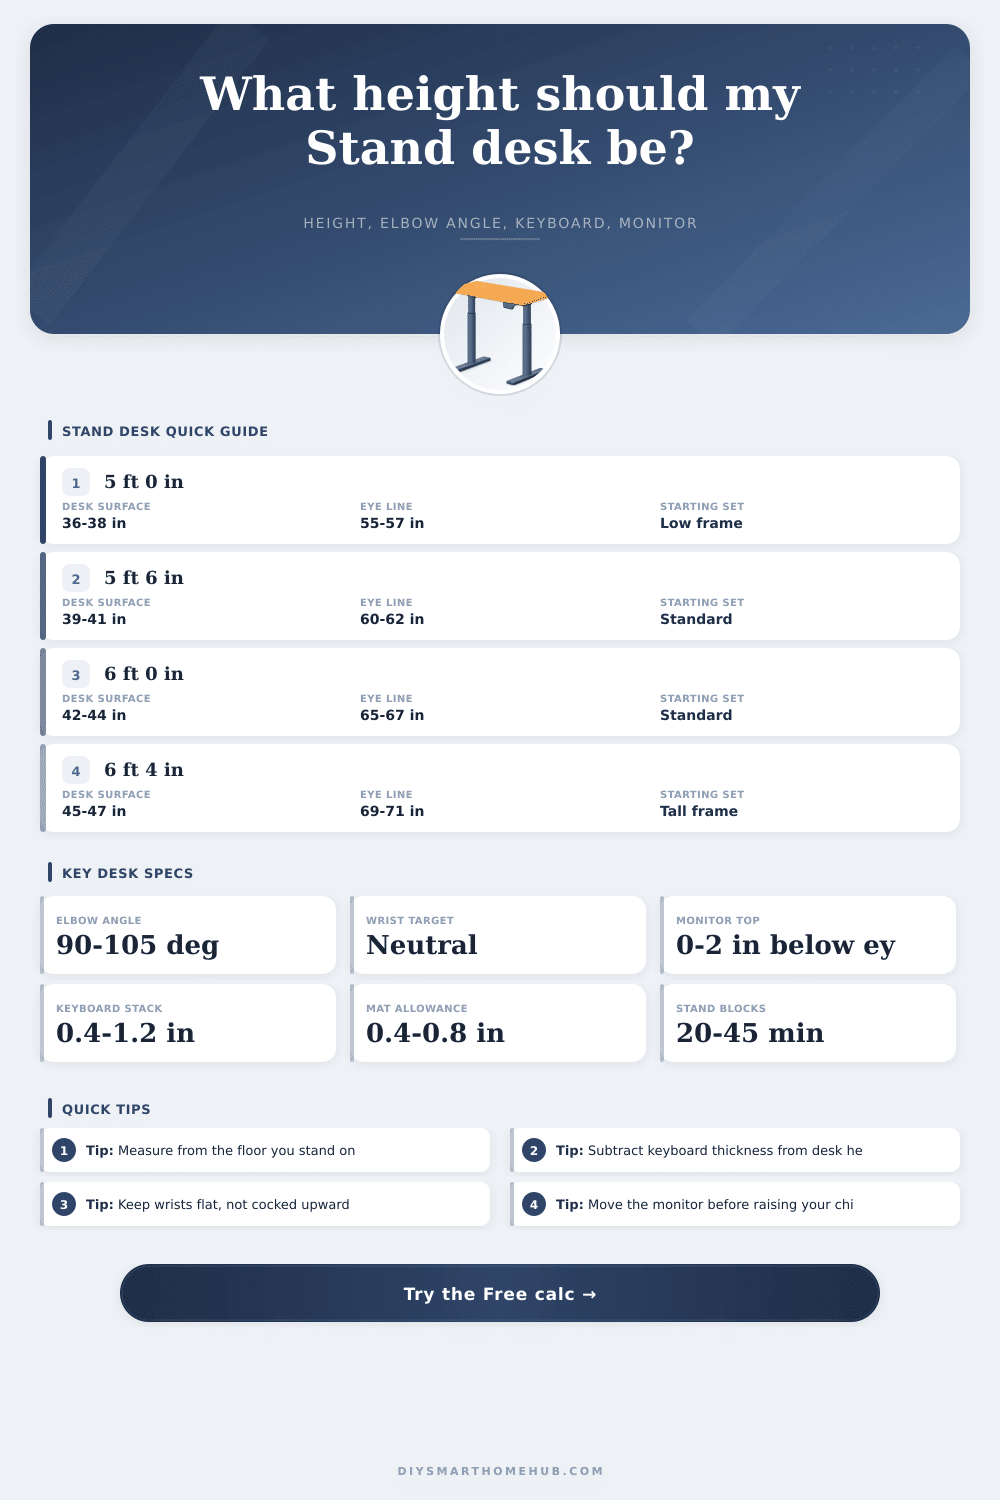
The start of comfort: Comfort is all about your elbow angle, though height is also a good starting point. If you read most guides they’ll instruct you to position yourself at ninety degrees because apparently we’re all statues, never moving. But then we type. We move our arm. Opening up the angle to ninety-five or even one-hundred degrees tends to be much more comfortabley. What happens here? The desk surface drop about an inch or two. And that lets your shoulders relax instead of hunch. It is a small difference but it makes a big difference when working for long periods. Your forearms should feel light, not like they’re hovering in the air.
Mats and shoes have secret mathematics. Next comes the secret math of mats and shoes. Your desk ought to sit lower if you’re standing on an anti-fatigue mat, versus higher if you’re on a thick one (or even higher still if you’re on high heels!). Or if you were to stand barefoot on a hard floor, it would be lower yet. Why? Because those layers raise your elbows off the ground (and the tool takes that into account). Otherwise, you’re perpetually reaching up just a bit too much, creating strain in the neck and trapping tension in the upper back. For good reason: Geometry doesn’t care about what you intend; it cares about where you actualy are.
This brings us back to monitor height: since eyes are the boss of the body, this needs its own mention. When your monitor sits too high, you’ll inevitably lift your desk up to view it, throwing off the alignment of your elbows. For the most part, the key here is realizing that there are two task at hand. You must raise your screen and set your desk for your shoulder and/or wrist height. Raise your screen so that the top edge is just beneath your eye line (or even with it), allowing your hands to reach their comfortable pace without putting strain on the cervical spine. Many folks makes the mistake of tying these two together as one permanent height.
Most people think about this transition delta (the distance between your seated height and your standing target), but it’s important: if that distance is large, it may be too hard to move so you don’t do it at all. It’s better to have a small, gradual range where you find yourself switching back and forth during the day. Your goal isn’t to stand still for an hour, but to have a rhythm to your day where you sit then stand again, then sit, etc. Even sixty minutes of standing is less effective than several shorter sessions spread across the morning and afternoon.
Things get trickier when you’re sharing a desk and no one can stand comfortable at the same ideal height. Here, go with whatever makes it easier for the tall person to stand, or spring for a keyboard tray that drops the typing area only (not the desk itself). That way, both folks can stand at a comfortable height for their monitors (which remain at a decent level) despite having different arm lengths. Yes, it’s a compromise. But as long as you don’t stretch out or lock your knees, it will work.
But ultimately this has nothing to do with finding one magic number and sticking with it forever. This is about dialing yourself in to something where your body can remain relaxed and moving freely throughout the day. Measure twice cut once right? Start here: adjust the surface height up or down by 1/2″ increments until your wrists remains flat and your shoulders relax away from your ears. What we are after isn’t standing rigid as a soldier on parade, it’s working in a way where you forget you’re even thinking about being ergonomic at all.